How to embed Keystone + SQLite in a Next.js app
This post is outdated and there's a newer approach to use Keystone with Next.js applications. Please check out Use Keystone in Next.js applications.
In this tutorial, we're going to show you how to embed Keystone and an SQLite database into a Next.js app. By the end, your app will have a queryable GraphQL endpoint, based on your Keystone schema, running live on Vercel (for free!). Content remains editable via the Admin UI in your development environment, with changes being published with each deployment of the app.
We'll take advantage of a new way of working with Keystone where you can run it from the same place you keep your frontend code and commit everything to Git.
If you're happy to write content in a local-only environment, and don't need a writeable API in production, this use case may be handy for you.
Explaining "modes"
As a Headless CMS, by default Keystone works in Standalone mode. Where you host your Content API separately from your frontend(s). While this is great for scale, it complicates developing and deploying simple apps and websites.
Keystone 6 introduces a new Embedded mode, which brings a different approach to integrating Keystone. It lets you embed Keystone inside another app, which can streamline the development and deployment of simple projects.
Keystone 6 also introduces SQLite support – giving you the option to store your files and database content within your local Keystone repo instead of an external host.
Note: Modes is conceptual framework. It has no dedicated APIs, and there are no mentions of modes in the API docs.
Embedded mode comes with some limitations that we explore later on.
Lets get started!
Here's what we're going to do:
- Create a Next.js app
- Embed Keystone, and run an Admin UI you can read and write to locally
- Add a simple Keystone Schema with a
PostList - Setup a secure read-only GraphQL API endpoint (and GraphQL Playground) that you can access in production
- Deploy the app to Vercel 🚀
Setup a Next.js app
Create a basic Next.js project with the --typescript option in an empty directory.
npm create next-app --typescript my-projectcd my-project
Keystone 6 has great TypeScript support. Including it in your project will make it easier to use Keystone's APIs later.
Delete the /pages/api directory. We'll add a GraphQL API later in the tutorial. Your /pages directory should now look like this:
.└── pages├── _app.tsx└── index.tsx
It is recommended that you use the same major version of next as used internally by keystone.
Start your local server
Run npm run dev at the root of your project.
Next.js will start a local server for you at http://localhost:3000
Add Keystone to your project
Now that we have the Next.js starter with static files, let‘s embed Keystone into the app to blend file-based content with content you can edit using Keystone's intuitive Admin UI.
Install dependencies
Add the following Keystone dependency to your project:
npm install @keystone-6/core
Update .gitignore
Add the .keystone directory to your .gitignore file. The contents of .keystone are generated at build time. You'll never have to change them.
# In your .gitignore.keystone
Create your Keystone config
To create and edit blog records in Keystone's Admin UI, add a keystone.ts configuration file to your project root with a simple Post list containing fields for a Title, Slug, and some Content.
// keystone.tsimport { config, list } from '@keystone-6/core';import { text } from '@keystone-6/core/fields';import { allowAll } from '@keystone-6/core/access';import type { Lists } from '.keystone/types';const Post: Lists.Post = list({fields: {title: text({ validation: { isRequired: true } }),slug: text({ isIndexed: 'unique', isFilterable: true }),content: text(),},access: allowAll});export default config({db: { provider: 'sqlite', url: 'file:./app.db' },lists: { Post },});
For simplicity we set all Post fields as text above. For a highly customisable rich text editor use the document field type.
Add Keystone to Next.js config
Edit the next.config.js file in your project root with the following:
// next.config.js/** @type {import('next').NextConfig} */- module.exports = {- reactStrictMode: true,- }+ const { withKeystone } = require("@keystone-6/core/next");+ module.exports = withKeystone({+ reactStrictMode: true,+ });
This is where the magic happens – the withKeystone function lets Next.js encapsulate Keystone in its script runtime, while Keystone still operates independently of the Next.js frontend ✨
Update package scripts
Finally, make a small change to the scripts object in package.json to include Keystone‘s postinstall script:
"scripts": {+ "postinstall": "keystone postinstall","dev": "next dev","build": "next build","start": "next start","lint": "next lint"},
Start all the things
Running npm run dev again will do the following:
- Provision a GraphQL schema based on the configuration of
keystone.ts - Build a Prisma.io schema (which Keystone uses to manage the database)
- Create the database and run a migration to set up your schema
- Serve Keystone's Admin UI at http://localhost:8000
- Serve the Next.js frontend at http://localhost:3000
- Add a
postinstallscript that ensures everything works if we install other dependencies later on
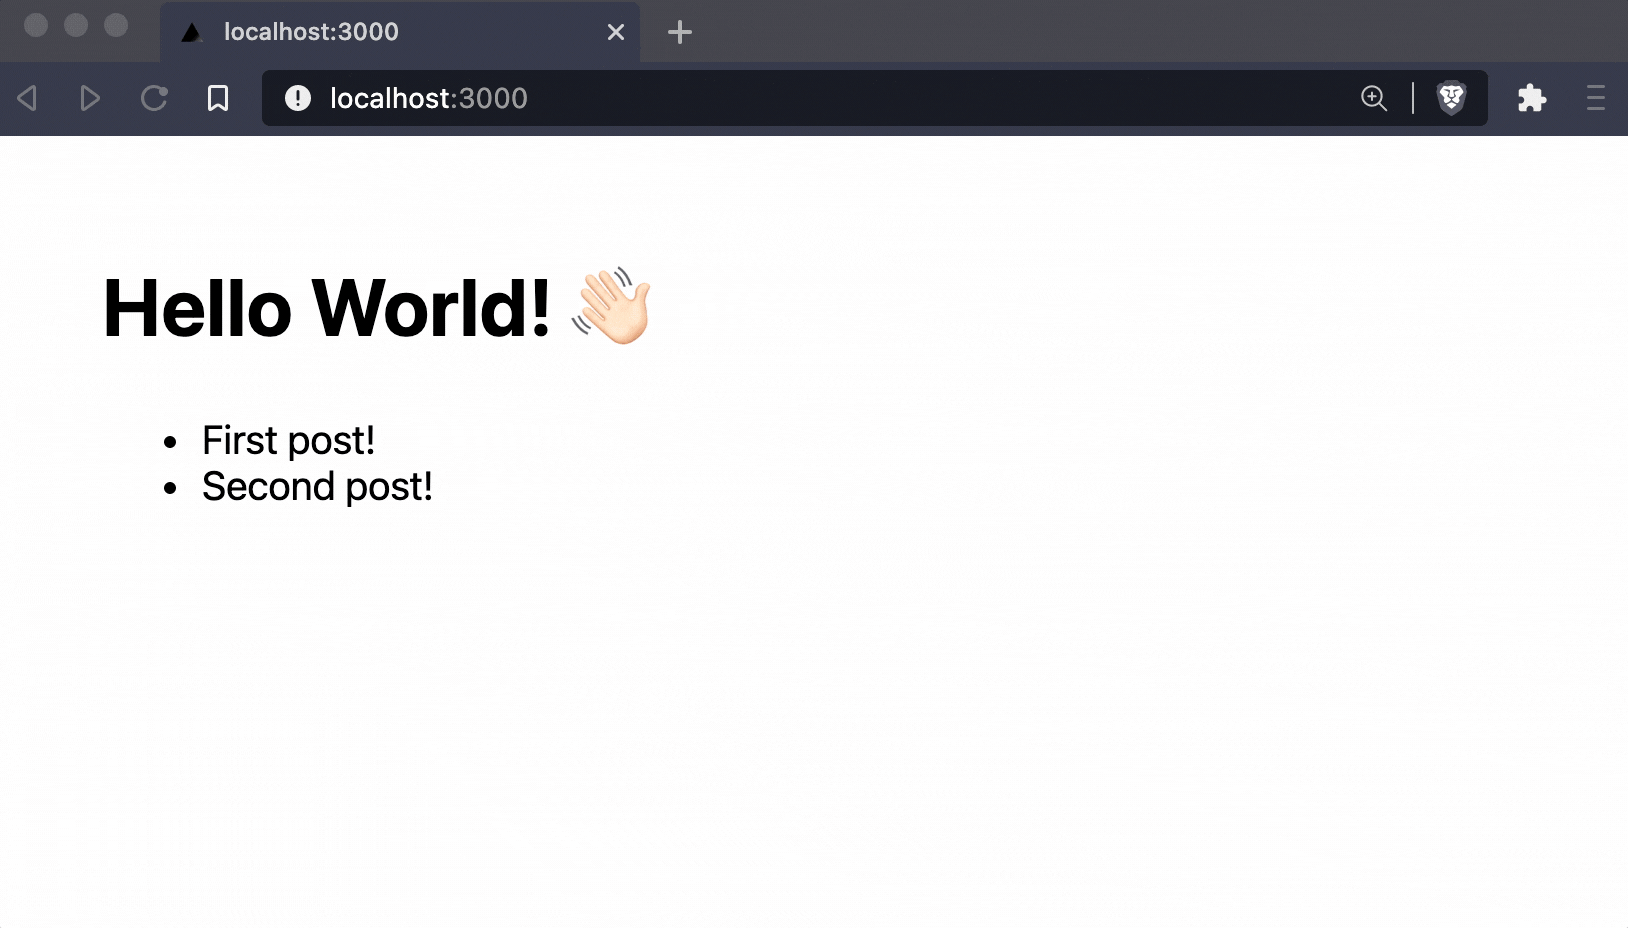
Go ahead and add two post entries using your Admin UI, ensuring you only use hyphens-and-lowercase-chars in the slug field for permalinks.
Query Keystone from Next.js
In order to query Keystone content we need to use the getStaticProps and getStaticPaths functions in Next.js. Let's overwrite the contents of pages/index.tsx with the following to query posts from Keystone:
// pages/index.tsximport { InferGetStaticPropsType } from 'next';import Link from 'next/link';// Import the generated Lists API and types from Keystoneimport type { Lists } from '.keystone/types';type Post = {id: string;title: string;slug: string;};// Home receives a `posts` prop from `getStaticProps` belowexport default function Home({ posts }: InferGetStaticPropsType<typeof getStaticProps>) {return (<div><main style={{ margin: '3rem' }}><h1>Hello World! 👋🏻 </h1><ul>{/* Render each post with a link to the content page */}{posts.map(post => (<li key={post.id}><Link href={`/post/${post.slug}`}>{post.title}</Link></li>))}</ul></main></div>);}// Here we use the Lists API to load all the posts we want to display// The return of this function is provided to the `Home` componentexport async function getStaticProps() {const posts = (await context.query.Post.findMany({ query: 'id title slug' })) as Post[];return {props: {posts,},};}
Now add a /post subdirectory in /pages and include the code below in [slug].tsx. This will generate a new webpage every time you publish a new post entry in Keystone's Admin UI.
// pages/post/[slug].tsximport { GetStaticPathsResult, GetStaticPropsContext, InferGetStaticPropsType } from 'next';import Link from 'next/link';import { query } from '.keystone/api';import type { Lists } from '.keystone/types';type Post = {id: string;title: string;content: string;};export default function PostPage({ post }: { post: Post }) {return (<div><main style={{ margin: '3rem' }}><div><Link href="/">← back home</Link></div><h1>{post.title}</h1><p>{post.content}</p></main></div>);}export async function getStaticPaths(): Promise<GetStaticPathsResult> {const posts = (await query.Post.findMany({query: `slug`,})) as { slug: string }[];const paths = posts.filter(({ slug }) => !!slug).map(({ slug }) => `/post/${slug}`);return {paths,fallback: false,};}export async function getStaticProps({ params }: GetStaticPropsContext) {const post = (await query.Post.findOne({where: { slug: params!.slug as string },query: 'id title content',})) as Post | null;if (!post) {return { notFound: true };}return { props: { post } };}
Run npm run dev again.
Congratulations! 🙌 You now have:
- A Next.js frontend blending static pages from your frontend repo with dynamic content from your database
- Dynamic pages powered by Keystone content that‘s editable in an intuitive Admin UI.
Bonus: add the GraphQL API to the frontend
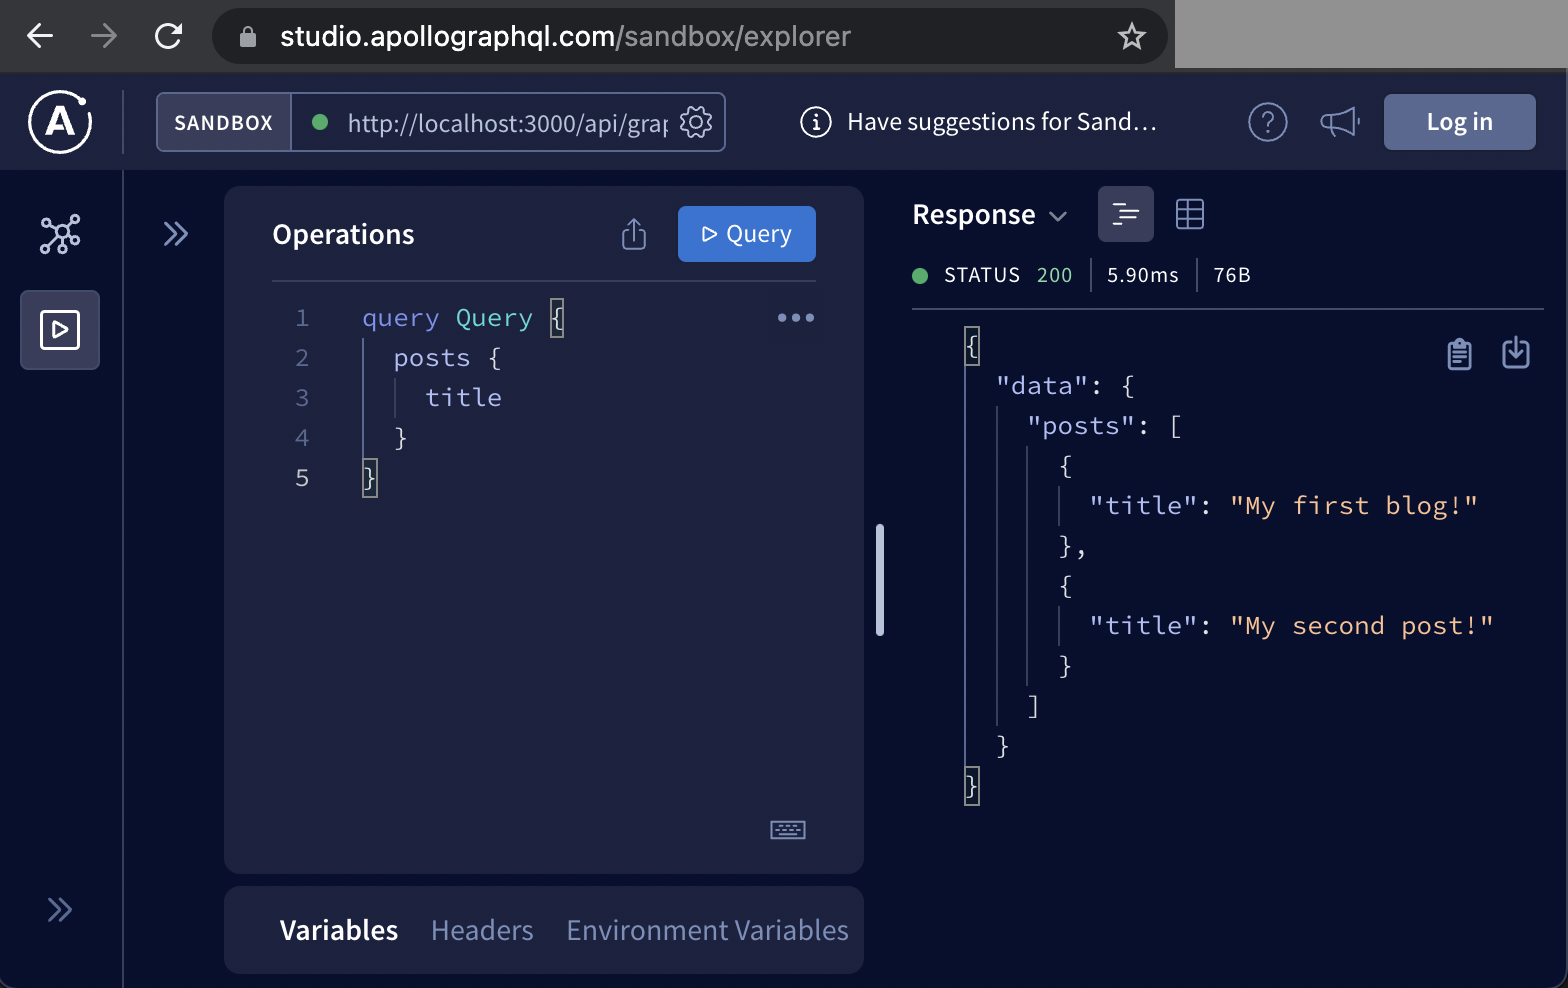
To get a read-only GraphQL API and GraphQL Playground in production, add /pages/api/graphql.tsxwith the following:
// pages/api/graphql.tsxexport { default, config } from '.keystone/next/graphql-api';
This takes the fully functional GraphQL API that Keystone is already generating and makes it available as an endpoint and GraphQL Playground within the Next.js frontend app at http://localhost:3000/api/graphql.
This gives you the ability to implement a search against the same content API you have running at build time, in run time.
Bonus: deploy to Vercel
To get your project on the internet via Vercel hosting complete the following steps:
- Commit your project to a repository in Github, Gitlab, or Bitbucket.
- Login to Vercel using an account from the services above.
- Create a new Vercel project and link it to your newly created repository.
Standalone VS Embedded modes
There are some limitations to be aware of running Keystone the way we've described in this tutorial:
- Because Admin UI access is restricted to a local development runtime, this mode is (currently) not suitable when you need more than one editor.
- SQLite doesn't support scalability, concurrency, and centralisation as well as PostgreSQL. If your project has scaling needs, you're probably better off with standalone mode and external PostgreSQL hosting.
It also has some advantages though:
- Your content and presentation are version controlled together
- It's an easy way to power a data-driven Next.js app
- The frontend can easily be deployed to hosts like Vercel
Embedded mode is a great way to operate a personal Next.js blog or portfolio with a CMS for content editing, instead of MDX.
Summary
Keystone's Embedded mode and SQLite support gives you the option to run a self contained CMS from the same place you keep your frontend code. While this option restricts read-write access to people who can run the project in local development, it has advantages with ease of setup, security, and web deployment. This is also a great way to deploy a read-only API on the web for content you manage on your computer.
If you like using Keystone, we'd appreciate a shout out in Twitter and a star in GitHub.